Painting Guide | Grimdark Fisherfolk Stranglers with Enamels
|


|
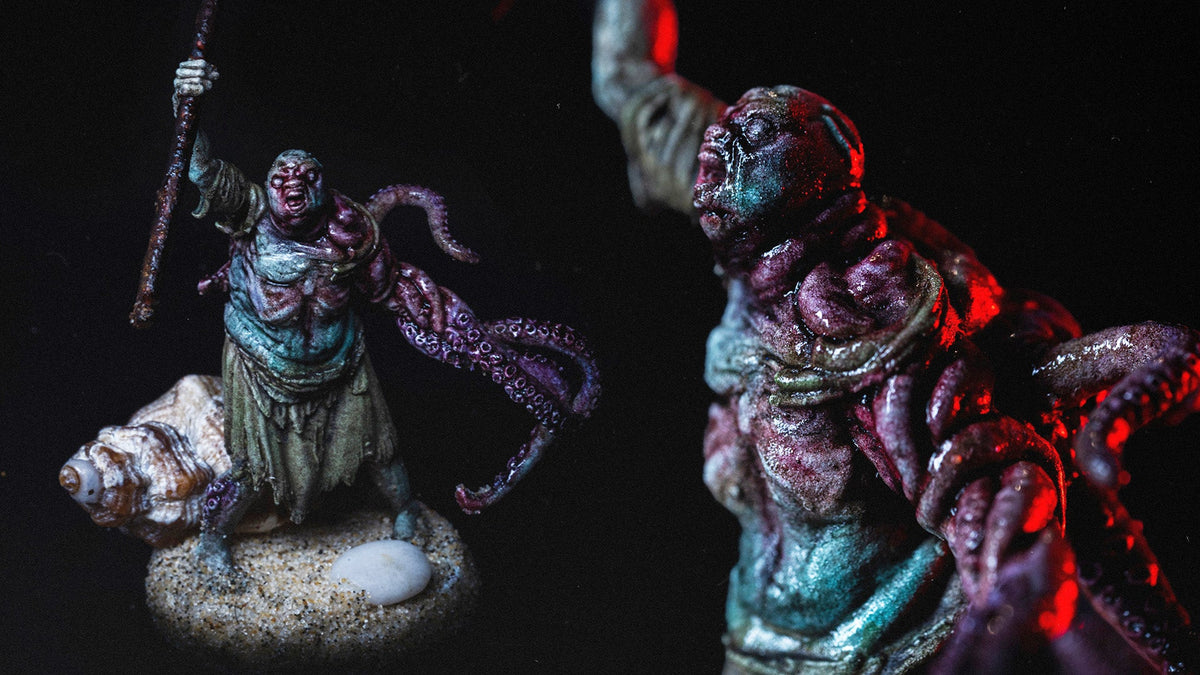
In this in-depth painting tutorial written by one of our wonderful community members, we explore the step-by-step process of how they painted a Fisherfolk Strangler from the N'Gorroth collection in the grimdark style, relying heavily on enamel paints such as the Villainy Inks produced by our friends over at the Grimdark Compendium.
The shorter video version of this tutorial can be viewed here:
(Music provided by Tabletop Audio)
Hello!
My name is Squiglover. I started painting miniatures about a year ago. Like many beginners, I focused on learning the basics through tutorials. I practiced base coating, thinning paints, building highlights and shadows, and following standard techniques. It helped me understand the process but often felt restrictive.
About three months ago I discovered enamels. That completely changed how I approach painting. Suddenly I could work more freely, experiment without fear, and fix anything that went wrong. Enamels gave me the freedom to express myself and create more atmospheric and unique results. Since then I haven’t looked back. The rules for paiting with enamels are little different so stick around and let’s begin!
Primer
Shades (Citadel)
Contrast
Acrylics
Enamels (Villainy Inks by Grimdark Compendium)
Oil Paints
Effects
Lahmian Medium (Citadel)
White Spirit (any kind)
Satin Varnish / Gloss Varnish
We start with White Scar as our primer. A white base gives us a clean surface where every thin layer is clearly visible. This lets us slowly build up our colors and keep full control over the effect. Since our method uses heavily thinned shades it is important to see exactly how each layer interacts with the one below. White works best for this because nothing gets hidden and it shows us precisely where the color goes.
For the skin we apply Coelia Greenshade thinned down a lot with water or a bit of Lahmian Medium. This makes the wash more transparent and easier to move around. Lahmian Medium also gives us more time before it dries so we can control how the shade settles. The goal here is to keep the first layer very subtle. We do not want to cover the white too strongly, instead we slowly start shaping the skin tone which will later blend naturally.
Next we bring life into the model by applying Carroburg Crimson. We place it carefully on the areas we want to feel warm and filled with blood. These are the zones where circulation would naturally show through the skin or where bruising would appear. For this model we focus on the ribs, the neck, the tentacles, and the growth on its back. We also touch the face with it, especially around the eyes and nose.
The key is to apply this shade slowly and in a controlled way. We are not flooding the surface, but guiding the crimson into the right places so it enhances the feeling of blood flow under the skin.
Now we cover the entire skin with a thin layer of Reikland Fleshshade, keeping it diluted. This wash settles into the recesses and between the tentacles, giving the skin more variation and a slightly dirtier, more natural look.
The goal here is to break the flatness of the base tone. Skin is never perfect, so this step adds subtle imperfections and warmth that make the surface feel alive. It also ties together the cooler green from the base coat with the warmer tones we already introduced.
To push the skin tone further we use Aethermatic Blue. We thin it down heavily with water and Lahmian Medium so the effect stays soft and transparent.
To make the skin feel more organic we add Druchii Violet. This shade is always diluted, just like the others, so it blends softly into the layers below. We apply it on top of some of the areas where we already used Carroburg Crimson to create the look of bruises and hematomas.
Real bruising changes color over time, shifting from red to purple and sometimes even yellow. By adding violet tones we enrich the effect of blood under the skin, making it more visually interesting and natural.
For this model we place Druchii Violet along the tentacles, especially on their outer edges and suction cups. We also add it to the neck and lightly around the ribs. This gives the sense of trauma, pressure, and discoloration, enhancing the grimdark feel of the flesh.
For the cloth we can use any muted tone that fits the model. My choice was Faded Green because it has a washed-out, desaturated look that matches the gritty atmosphere of grimdark painting.
Working with enamels is very forgiving and enjoyable. After applying them we have many hours to manipulate the effect, adjust it, or even remove it completely with White Spirit if something does not look right.
For this step we use Goon’s Grime mixed 1:1 with White Spirit. We apply it over the entire model on the skin, the tentacles and the cloth to unify all tones and give depth. After covering the miniature we let the enamel dry. To speed up the process we can use a hair dryer set to medium heat, keeping it at a safe distance. Around 30 seconds to a minute is usually enough but the key is to visually confirm that the wash is fully dry.
It is always best to let each enamel layer dry fully before adding the next one, but we all know we do not want to wait that long. After every layer we can use a hair dryer to speed up the process and quickly see how the effect will look once it has dried.
With enamels we can use the reductive technique to control how the wash settles and to create natural highlights and shadows. For this step we need White Spirit (or Mineral Spirit), cotton Q-tips, and optionally a brush for more precise work.
We gently dab a Q-tip moistened with Mineral Spirit on the surface of the model. This reduces the excess Goon’s Grime and pushes it back into the recesses while leaving a thin layer on the raised areas. The effect is a natural unifying wash that blends all the previous shades together. At the same time it automatically creates highlights on the raised details and deeper shadows where the enamel collects.
The key is to work gently. We do not rub or scrub the surface, only dab lightly. This way we avoid damaging the earlier acrylic shade layers underneath. For areas that need more control we can switch to a brush moistened with Mineral Spirit, which allows us to physically push or pull the enamel exactly where we want it.
This step brings harmony to the colors while adding depth and definition to the skin and cloth.
Now we move on to Carrion Crimson. This enamel can work both as a wash and as a blood effect depending on how much White Spirit we add. In a 1:1 mix with White Spirit it behaves like a wash, reinforcing the warmth and blood flow effects we created earlier with the shades.
We apply it in the same areas as before: around the ribs, between the tentacles, on the suction cups, on the growth along the back, and around the eyes, nose, mouth, and tongue. These are the natural spots where circulation and bleeding would show.
Carrion Crimson has a special quality. It contains small granulated particles that resemble tiny clots of blood. To make use of this effect we need to shake the bottle very well before use. The particles also settle at the bottom of the palette, so when loading the brush we make sure to catch them. This adds realism to the finish and gives the look of dried or coagulated blood mixed into the wash.
We usually do not need reductive technique here, unless we accidentally apply too much. In that case we can gently remove the excess with a Q-tip moistened with White Spirit.
For this step we use Coelia Green, thinned about 1:1 with White Spirit or even more depending on how strong we want the accent to be. We place it mainly in the cooler areas of the skin where we already used Coelia Greenshade. Typical spots are the stomach and chest, as well as parts of the head and back. On the tentacles we can apply it to the opposite side from the crimson tones to create a natural transition from cold greens to warm reds around the suction cups.
One of the strengths of enamels is how naturally they blend together. Coelia Green flows smoothly into Carrion Crimson, producing very organic shifts in color. This makes the process highly flexible and open to experimentation. Since we have many hours to manipulate enamels, we can keep adjusting until we reach the balance we want. If we apply too much Coelia we can always add back a little Crimson, and vice versa. The surface remains workable and forgiving, letting us fine-tune the proportions and create subtle variations across the skin.
Now we bring in Dioxazine Purple, thinned heavily with White Spirit. We apply it mainly to the tentacles, the neck, and the growth on the back. The purple shifts the tone and adds a strong, bruised effect that blends into the warmer crimson areas.
As always we let it start drying and then use reductive technique with a Q-tip or a brush moistened in White Spirit to control how much of the color stays. This way the purple connects smoothly with the reds we built earlier, creating natural transitions across the flesh.
This stage is highly experimental. The amount of dilution, the placement, and the blending are all up to personal taste. There are no strict rules here. Explore, adjust, and enjoy the freedom this step provides.
Next we bring in Ichor of the Damned. This is a dark black wash that can also work as a stronger effect if we use it pure. Thinned with White Spirit it becomes softer and easier to control.
We apply it mainly into selected recesses to create deeper shadows and natural dirt. Good spots are the folds of the cloth, between the ribs, and in the smaller folds of the skin. We can also place a little around the eyes and along the tentacles to add contrast.
This enamel is quite special and it is worth experimenting with it to observe how the color shift develops on the surface. It can be used not only to create depth but also to darken other effects slightly, making them feel moodier and more grim. The key is to keep an eye on how it builds and use it where we want more intensity or shadow.


For the weapon we keep things simple but striking. I wanted it to look heavily rusted and only partially stained with blood. To achieve this I covered the whole weapon with Dirty Down Rust, one of the most effective rust effects in miniature painting.
While the surface was still wet I mixed in Blood for the Blood God on the upper parts. The combination of the rust effect with the glossy acrylic creates the impression of old, dried blood fused with corroded metal.
Rust effects are very forgiving and open to experimentation. In my case, Dirty Down Rust mixed with Blood for the Blood God gave the perfect look of a decayed, bloodstained weapon.
For the finishing stage we use Carrion Crimson straight from the bottle, without thinning it with White Spirit. Applied this way it becomes a strong blood effect with visible tiny particles that look like clots. Once dry it keeps a wet, glossy appearance, perfect for enhancing specific spots where we want the look of fresh, wet blood. We place it very precisely with a fine brush on the ribs, around the mouth, the tongue, or any other areas that need a stronger highlight of gore.
As the very last touch we can decide how we want the skin to look overall. A thin layer of Gloss Varnish will make it appear wet and slimy, as if the creature just emerged from water, while Satin Varnish gives a softer sheen that still keeps the skin alive without making it overly reflective.
If during the painting process we accidentally stained the white eyes, we can simply use a fine brush moistened with 99.9% isopropyl alcohol. With gentle strokes we carefully clean the surface so the eyes remain bright white and stand out in strong contrast against the rest of the model.

And that’s it! Believe me, these techniques are much simpler than they seem. The best proof of that is the fact that the model I just painted was done without any clear plan. This was my first tutorial ever, and I started it without knowing where it would take me. I simply set up the camera properly and started recording.
I looked at some artwork of the Stranglers on the Bestiarum website and used that as a starting point. Then I chose a few shade colors that I felt would fit the mood. The rest was just slow color building and imagination. The whole process took me maybe three hours in total.
So I can’t stress this enough. If you like this painting style, all you really need is a few enamels, some white spirit and let your imagination guide you.
If you’d like to be part of the darker side of miniature painting, check out @conclave_obscura on Instagram and join the Discord channel. It’s an inspiring place to learn, share your work, and connect with fellow enthusiasts who are always ready to help and exchange ideas.
Cheers!
-
This post was written by one of the lovely members of our community. If there's an article, guide or other feature you'd like to share, reach out to us at contact@bestiarumgames.com!
Editing by Sam Franquet


