Welcome to this painting guide forDemonettes , where we'll dive into a quick, effective method for achieving a grimdark yet vivid finish. This guide emphasizes speed , lazy techniques, and big visual payoffs , perfect for hobbyists who want strong results without necessarily requiring too many fine motor skills.
-
Marcus here - Reliquat28 over on Instagram, and Lead Producer here at Bestiarum. When I’m not greasing the wheels of production to get your releases delivered, I’m out painting my way through a bunch of miniatures for fun, and perhaps a little studio photography for the website.
Over the past 15 years, I’ve developed an approach to painting that I really enjoy. One that delivers striking results and looks pretty realistic, while avoiding all the painting techniques that I don’t enjoy (looking at you layering).
In this post, I’ll aim to share some insight into the process in a simple, approachable step-by-step guide.
Paint List
I'll be working with a combination of Acrylic Paints , Speedpaints , Washes , and the Effect PaintBlood for the Blood God. Here's my exact paint list - but don’t stress about matching every item. These techniques are pretty adaptable for whatever you’ve got on hand.
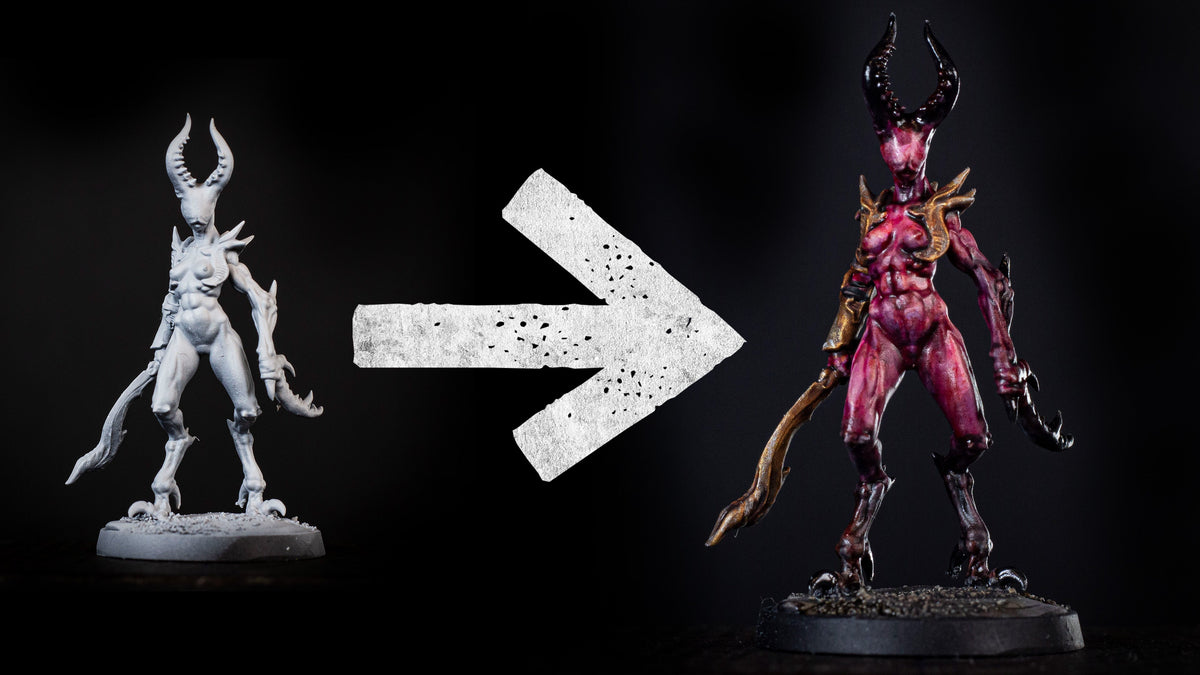
Before we dive in, here's a gallery of all the stages, so you can quickly flick through and see the difference between each step.
Step 1 – Zenithal Undercoat
Start with a black primer , then use your airbrush to apply white from above at 90° , followed by a softer spray at 45° . This will give you a strong highlight map and set the stage for vibrant contrasts later on.
Step 2 – Basecoat with Speedpaints
Apply Familiar Pink over all fleshy areas. Then, use Grim Black for claws, talons, and tougher surfaces. If you feel like blending the transition between pink and black a little, go for it, but don't worry too much. We'll finesse this later.
Step 3 – Drybrush Highlighting
Once dry, lightly drybrush the entire miniature with Flayed One Flesh (or any ivory/off-white). Focus on the pink skin first, allowing the brush to naturally hit raised areas. Let the residual paint softly catch the black zones for subtle texturing.
Step 4 – Metallic Basecoats
Paint all metal areas with Retributor Gold . This gold contrasts beautifully with the pinks and blacks, but if you prefer a more muted palette, silver works too.
Step 5 – Red Wash (Targeted)
Use Carroburg Crimson to add warmth and depth. Apply it into recesses and blend outward with a brush. This will re-tint the pink areas post-drybrush, adding richness without overwhelming detail.
Step 6 – Black Wash (Heavy)
Now hit all the black regions with a generous coat of Nuln Oil . This will help deepen contrast and texture. Avoid letting it bleed into the pink, this wash is unforgiving and will kill your work with the red wash.
Step 7 – Purple Wash (Transitions)
Apply Purple Swarm or a similar purple wash around shaded zones, especially where pink meets black . This adds visual interest and softens any jarring transitions.
Step 8 – Wash the Metals
Wash gold areas with Agrax Earthshade for an aged, muted effect. If you used silver, consider Nuln Oil or even a dark green/blue wash to create an eerie, otherworldly feel.
Step 9 – Reassert Talons & Teeth
Recoat claws, teeth, and horn tips using Grim Black again. This darkens and sharpens those features, while keeping some of the earlier drybrushed texture visible.
(Optional: Touch up any areas that look washed out with your pink or purple speedpaints.)
Step 10 – Metallic Highlights
Pick out edges and raised metal details with Liberator Gold , then add small accents of Ironbreaker to pop the highest highlights.
Step 11 – Matte Varnish
Seal the model with a Matte Spray Varnish . This step unifies all your finishes , removing any chalky or shiny inconsistencies, and gives a solid foundation before adding final effects.
Step 12 – Gloss Accents
Once dry, grab your brush-on gloss varnish . Apply it to talons, horns, and black areas to add a beetle-like shine. This subtle touch adds a sinister edge to the Demonettes.
Step 13 – Blood Glaze
The final (and most fun) step: use Blood for the Blood God as a glaze , not a splatter.
With a fine, damp brush , apply it into muscle lines, crevices, and shadowed areas .
Think of it like a tint, less is more.
Use a clean damp brush to feather the paint up toward high points of the musculature.
Work one small area at a time, the acrylics dry fast.
Tip: Lightly tap with your fingertip to remove excess shine from raised areas.
Closing Thoughts
And that’s it! Your Demonette is ready to grace the tabletop in all her slick, glistening, creepy glory.
This approach is quick, forgiving, and adaptable. You can substitute steps (e.g., layering instead of drybrushing), experiment with colours, or lean into different effects like blood splatter or poisonous green ichor.
We’d love to see what you create! Share your results with us on Facebook, Instagram, Discord , or email us directly at contact@bestiarumgames.com
You didn’t mention how to paint the nipple. It’s white in step 1 and never mentioned in the description. How did you do that? I’ve got a number of figures (male and female) that need that final touch.
Marcus, this painting guide is fantastic. THis is the first guide I actually took to the store and bought the paints I was missing so I could replicate, approximate really, your approach.
I also REALLY appreciate that this video builds on the “Painting Nasty Flesh” tutorial by using a lot of the same paints.
PLEASE make more of these tutorials while re-using the same paints.
Again, thank you … whio ever knew there would be a use for “Familiar Pink”!
GREAT job!
Really awesome guide! Please make more of those when possible!
Marcus, mate, your gorgeous paintjob once again sells these incredible models! I believe your style is so perfectly complementary to the detail that these sculpts provide. I always look forward to seeing your take on each model! <3